Easy DIY Canada Day Craft for Children- Paper Plate Maple Leaf Flag
Canada Day is just around the corner, and you know what that means – it’s time to get crafty with the little ones! As a kindergarten teacher who’s been in the classroom for over a decade, I’ve learned that the best holiday crafts are the ones that are simple enough for tiny hands but meaningful enough to spark real conversations about our beautiful country.
This paper plate maple leaf flag craft has become my absolute go-to for Canada Day celebrations. It’s mess-friendly (trust me, that matters!), uses materials you probably already have in your craft cupboard, and gives kids a chance to practice those fine motor skills we’re always working on. Plus, the finished product looks fantastic hanging in the classroom or sent home for proud parents to display on the fridge.
What Makes This Craft Perfect for Kindergarteners
Before we dive into the fun stuff, let me tell you why this particular craft works so well for our youngest learners. First off, it doesn’t require perfect cutting skills – hallelujah! We’re working with basic shapes and forgiving materials. The paper plate gives us a sturdy base that won’t tear easily when little fingers get enthusiastic with the glue stick.
The craft also hits multiple learning objectives without feeling like work. Kids practice cutting, gluing, and color recognition while learning about Canadian symbols. It’s what we teachers call a “sneaky learning” activity – they think they’re just having fun, but they’re actually developing crucial skills.
Gathering Your Supplies
Here’s what you’ll need for each child, and I promise none of these items will break the classroom budget:
- 2 white paper plates (the sturdy kind work best)
- Red construction paper or red paint
- Coffee filters (this is where the magic happens!)
- Red food coloring or washable markers
- Glue sticks (way less messy than liquid glue)
- Child-safe scissors
- Popsicle sticks
- Small spray bottles with water
- Paper towels for cleanup
Pro tip from my classroom: set up all your supplies on a tray for each table. It cuts down on the chaos and helps kids stay focused on the actual crafting instead of wandering around looking for materials.
Step-by-Step Instructions
Getting Started
Begin by giving each child one paper plate. This will be their flag base. If you’re working with a larger group, I recommend doing this craft in stations – it keeps things manageable and gives you a chance to help individual kids who might be struggling.
Creating the Flag Background
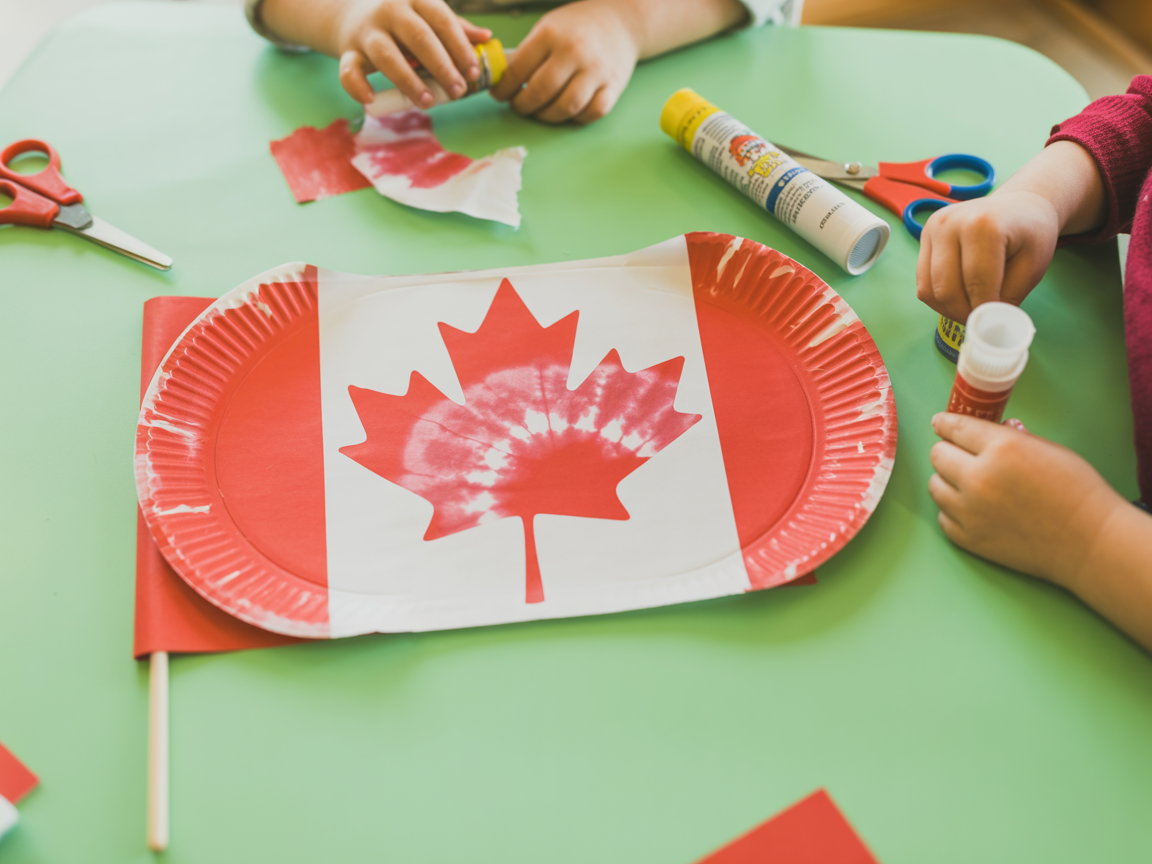
Take that first paper plate and help the kids divide it in half mentally. We’re going to make the left side red and keep the right side white, just like our Canadian flag. For the red section, you can either have kids paint it with red paint (be prepared for some creative interpretations of “half”!) or glue on red construction paper.
I’ve found that pre-cutting red construction paper into semicircles works really well. The kids can glue these pieces onto their plate, and it gives them practice with spatial awareness as they figure out how to cover just one half.

The Magic Maple Leaf
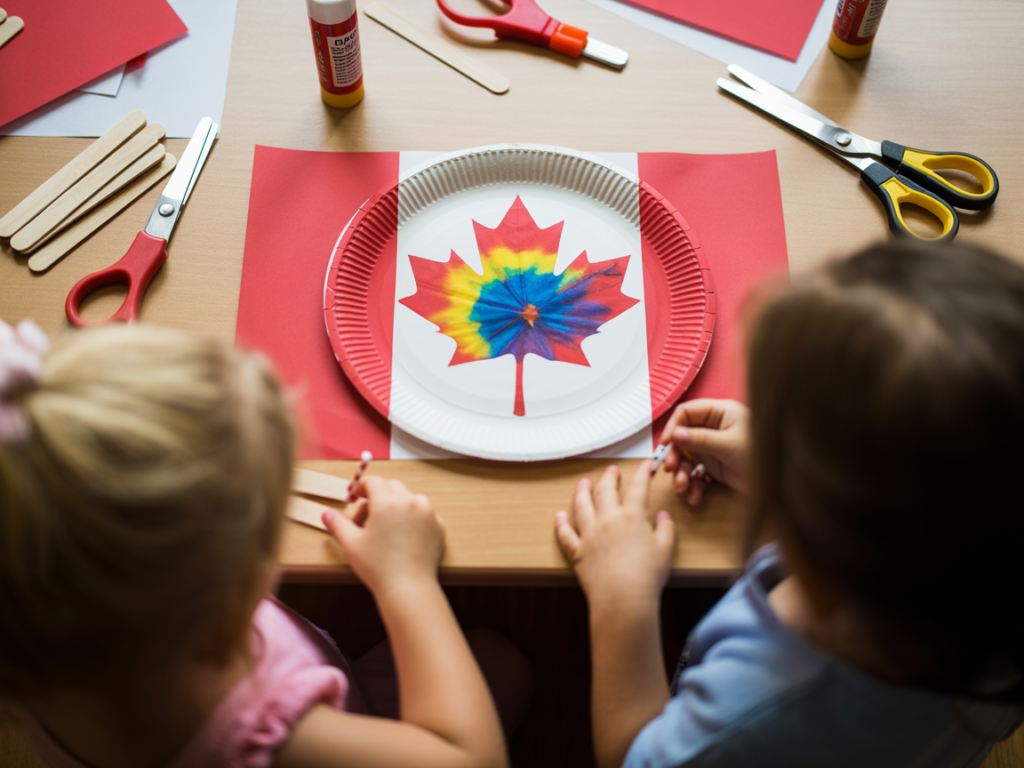
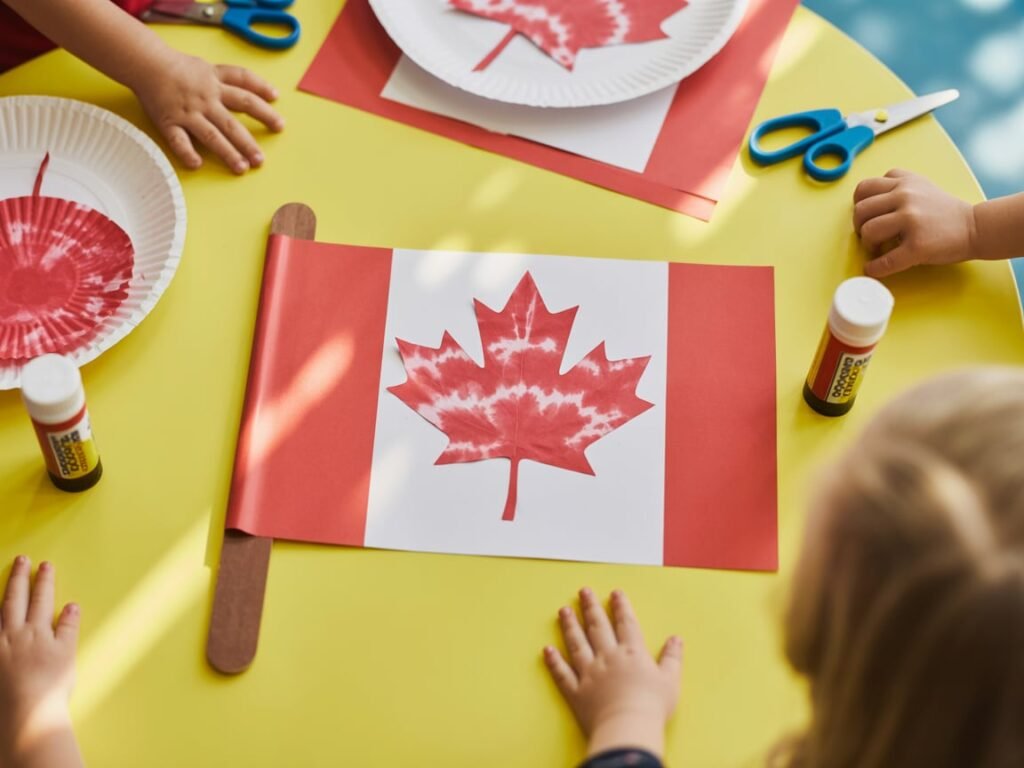
Now comes the part that always gets the kids excited – making the maple leaf! Take a coffee filter and fold it in half, then in half again. You’ll end up with a quarter-circle shape.
Here’s where you can let the kids’ creativity shine. Give them red washable markers or let them dip the folded coffee filter into a small container of water mixed with red food coloring. The color will bleed and spread through the filter in the most beautiful way. It’s like magic to five-year-olds!
Once the coffee filter dries (this takes about 10-15 minutes, perfect time for a story or song), unfold it carefully. You’ll have a gorgeous tie-dyed circular piece. Now, help the kids fold it in half and cut out a simple maple leaf shape. Don’t worry about making it perfect – the tie-dye effect is so pretty that even wonky maple leaves look amazing.
Assembly Time
Take your second paper plate and cut out the center, leaving just the rim. This creates a nice frame for your flag. Help the kids glue their red and white paper plate inside this frame.
Next, glue the beautiful tie-dyed maple leaf right in the center of the white section. The contrast looks absolutely stunning, and kids are always so proud of how their unique leaf turned out.
Adding the Final Touch
Tape or glue a popsicle stick to the back of the frame to create a handle. Now you’ve got a proper flag that kids can wave around during your Canada Day celebration!
Classroom Management Tips
Let me share some hard-earned wisdom from my years of doing this craft with kindergarteners. First, have wet wipes ready – lots of them. Even with the most careful preparation, little hands will find ways to get colorful.
Set up a drying station for the coffee filters. I use a clothesline with tiny clothespins, and the kids love hanging up their “magical” filters to dry. It becomes part of the experience.
Don’t stress about perfection. Some kids will want to make their entire plate red, others will insist their maple leaf needs to be purple. These variations lead to wonderful conversations about creativity and personal expression.
Educational Extensions
This craft opens up so many learning opportunities! While the coffee filters are drying, we talk about Canadian symbols. I’ll ask questions like “What other things remind you of Canada?” and we make lists together. Kids often mention hockey, snow, beavers, and sometimes even Tim Hortons (which always makes me chuckle).
We also practice counting – how many points does a maple leaf have? Can you find the shapes in our flag? It’s amazing how naturally math concepts weave into craft time.
For kids who finish early, I have them help classmates or start decorating the popsicle stick handle with red and white stripes using markers.
Modifications for Different Needs
Every classroom has kids working at different levels, and this craft is wonderfully adaptable. For children who struggle with scissors, pre-cut all the pieces and let them focus on the gluing and decorating.
Kids who need extra challenge can create multiple maple leaves or add details to their flag design. Some of my students have added “Happy Canada Day” messages or drawn other Canadian symbols around the border.
For children with sensory sensitivities, the coffee filter activity might be overwhelming. In those cases, I have pre-made maple leaf stencils they can trace and color with crayons instead.
Taking It Home
One of the best parts of this craft is how excited kids are to show their families. I always send home a little note explaining what we learned and suggesting ways parents can extend the conversation. Maybe they can look for Canadian flags in their neighborhood or talk about family traditions for Canada Day.
The flags are sturdy enough to survive the journey home in a backpack, which isn’t always the case with kindergarten crafts! Parents often tell me these flags made it onto the fridge and stayed there well past Canada Day.
Final Thoughts
This paper plate maple leaf flag craft has become a cherished tradition in my classroom, and I hope it brings as much joy to yours. There’s something special about watching five-year-olds carefully work on their flags, chatting about what makes Canada special to them, and beaming with pride at their finished creations.
The best part? You’ll probably find yourself saving a few of these flags each year. They make beautiful decorations for future Canada Day celebrations, and they’re wonderful keepsakes that capture the spirit of learning and creativity that makes kindergarten such a magical time.
So gather those paper plates, break out the coffee filters, and get ready for some wonderfully messy, joyfully educational Canada Day fun. Your little learners are going to love it, and you might just find yourself getting excited about the magic of tie-dyed maple leaves too!

Ms. Kerri’s Corner provides a exciting virtual space for preschool learning. Through a variety of engaging activities, she exposes young minds to early math, literacy, science and social-emotional skills in a developmentally appropriate way. Centers for blocks, art, books and music allow children to explore hands-on learning at their own pace. Guided lessons subtly introduce number sense, letter sounds and narrative thinking. Careful observation gives insight into each child’s progress across domains. Viewers are also invited to participate, reinforcing that their ideas are valued. By making learning fun yet purposeful, Ms. Kerri lays the groundwork for future academic success while fostering creativity and imagination. Her program offers preschoolers valuable screen-based learning experiences.