DIY Plasticine Recipe That Actually Works (No Crumbly Mess!)
Last Tuesday, I found myself frantically searching through craft drawers for something to keep my four-year-old occupied while I finished a work call. The store-bought play dough had dried out completely, and a full-blown meltdown was brewing. That’s when I remembered my grandmother’s old recipe for homemade modeling clay that she used to make when I was little.
Thirty minutes later, I had the most incredible batch of smooth, pliable clay that kept my daughter busy for hours. Even better, it cost me practically nothing to make using ingredients I already had in my kitchen. Now I’m sharing this game-changing recipe with you because every parent deserves to have this trick up their sleeve.
Making DIY plasticine at home isn’t just about saving money (though you definitely will). It’s about creating something together, knowing exactly what ingredients your children are handling, and having the satisfaction of making something that works even better than the expensive store-bought versions.
Why Homemade Beats Store-Bought Every Time
I’ll be honest – I used to think making modeling clay from scratch was one of those Pinterest projects that looked great in photos but never actually worked in real life. Boy, was I wrong. The homemade version is smoother, more pliable, and lasts longer than anything I’ve ever bought.
Store-bought play dough seems to dry out the moment you open the container, no matter how tightly you seal it. It gets crumbly, loses its stretch, and often leaves kids frustrated when their creations fall apart. Homemade plasticine, on the other hand, stays soft and workable for months when stored properly.
There’s also something magical about making it together with your kids. They love watching the ingredients transform from a sticky mess into smooth, colorful clay. It becomes part of the play experience, not just the end result.
The Secret to Perfect Texture
The key to making DIY plasticine that actually works lies in the cooking process. I know, I know – cooking play dough sounds intimidating. But trust me, it’s worth the extra step. The heat helps all the ingredients bind together properly, creating that perfect smooth texture that doesn’t crack or crumble.
Most no-cook recipes I’ve tried end up either too sticky or too dry. They work for about five minutes before turning into a frustrating mess. The cooked version, however, has that professional quality that keeps kids engaged for hours.
What You’ll Need
The beauty of this recipe is its simplicity. You probably have everything already:
- 2 cups all-purpose flour
- 1 cup salt
- 2 tablespoons cream of tartar (this is the secret ingredient that makes it stretchy)
- 2 tablespoons vegetable oil
- 2 cups water
- Food coloring
- Essential oil for scent (optional, but lavender or vanilla smell amazing)

That’s it. No weird ingredients you’ll never use again, no special equipment. Just basic pantry staples that work together to create something incredible.
The Step-by-Step Process
Start by mixing all your dry ingredients in a large saucepan. Whisk the flour, salt, and cream of tartar together until they’re well combined. This prevents lumps later on.
In a separate bowl, mix the water, oil, and food coloring. I usually make several different colors at once, so I divide the liquid mixture into separate bowls and add different colors to each. Pro tip: gel food coloring works much better than liquid – you get more vibrant colors without making the mixture too wet.
Here’s where it gets fun. Pour one colored liquid mixture into your dry ingredients and stir constantly over medium heat. It’ll look like a goopy mess at first, and you might panic thinking you’ve done something wrong. Don’t worry – this is totally normal.
Keep stirring as the mixture heats up. It’ll start to thicken and pull away from the sides of the pan. This usually takes about three to five minutes, depending on your stove. The mixture will transform from a sticky batter into a smooth, dough-like consistency right before your eyes.
When it forms a ball and stops sticking to the pan, remove it from heat. Let it cool completely before handling – it’ll be quite hot at first. This is a great time to start on your next color if you’re making multiple batches.
Getting the Colors Just Right
Color mixing is where you can really have fun with this project. Making DIY plasticine gives you complete control over the shades, and you can create custom colors that you’d never find in stores.
Start with less food coloring than you think you need – you can always add more, but you can’t take it out. I learned this the hard way when I made what was supposed to be light pink and ended up with neon magenta.
For natural colors, try using spices instead of food coloring. Cocoa powder makes beautiful brown clay, turmeric creates a gorgeous golden yellow, and paprika gives you a lovely orange. These natural colorants also add interesting textures and subtle scents.
If you want marbled effects, don’t mix the coloring in completely. Leave some streaks for a tie-dye look that kids absolutely love.
Storage Tips That Actually Work
This is where most homemade play dough recipes fail you – they don’t tell you how to store it properly. Your beautiful DIY plasticine will last for months if you follow these simple storage rules.
First, let it cool completely before storing. Any residual heat will create condensation in your container, which leads to mold. Once it’s room temperature, wrap each color individually in plastic wrap, then store all the wrapped pieces in an airtight container.
I use old yogurt containers or mason jars. The key is eliminating air exposure. Even a tiny bit of air will start the drying process, and nobody wants crumbly play dough.
Store your containers in a cool, dry place. The refrigerator works great, especially in hot weather. Just let it come to room temperature before playing – cold play dough is hard and not much fun to work with.
Troubleshooting Common Problems
If your plasticine turns out too sticky, you probably didn’t cook it long enough. Put it back in the pan and cook for another minute or two, stirring constantly. It should pull cleanly away from the sides when it’s ready.
Too dry or crumbly? Add a tiny bit of oil and knead it in. Start with just a few drops – you can always add more, but it’s hard to fix play dough that’s too oily.
If it’s not stretchy enough, you might need more cream of tartar next time. This ingredient is what gives the clay its elasticity, so don’t skip it or substitute it with something else.
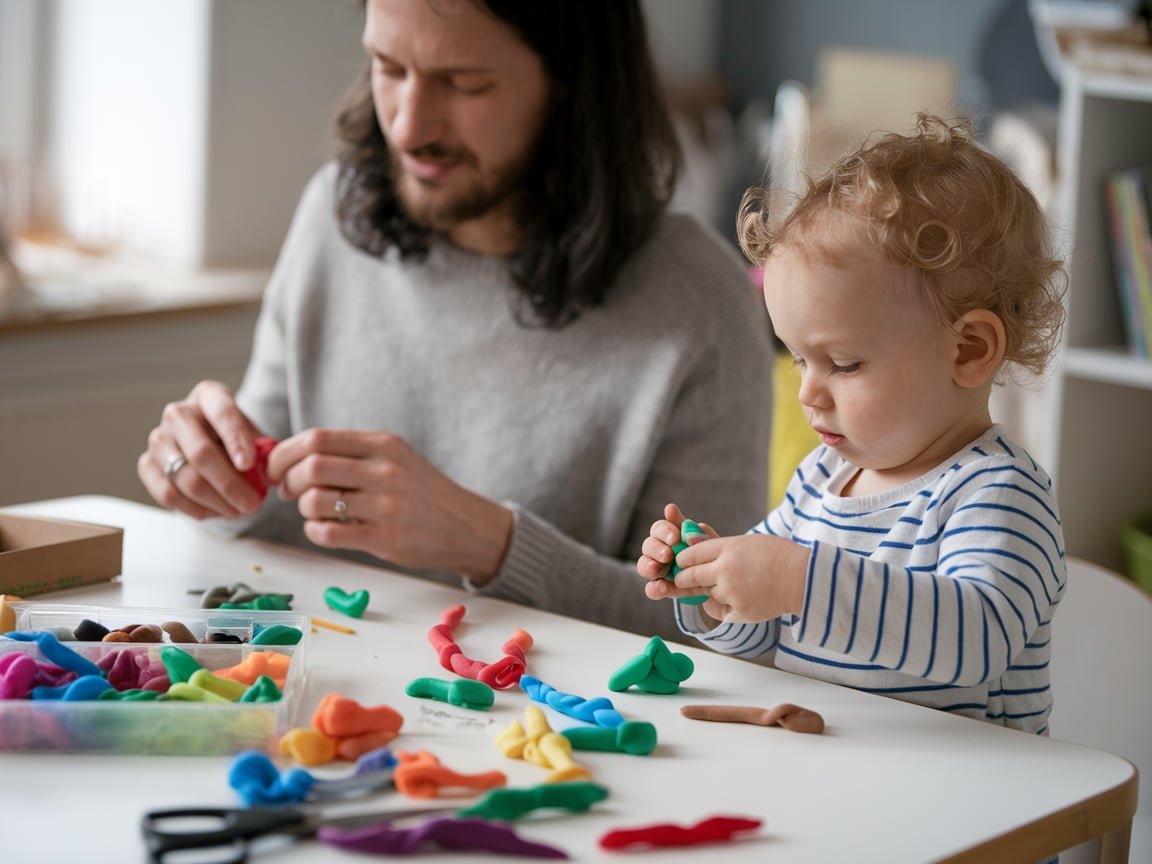
Creative Ways to Use Your Homemade Clay
Once you’ve mastered making DIY plasticine, the fun really begins. We use ours for everything from traditional sculpting to learning activities. Roll it flat and use cookie cutters for endless shape fun. Hide small objects inside balls of clay for a surprise discovery game.
Make impression tiles by pressing leaves, shells, or textured objects into flattened pieces. Create pretend food for restaurant games, or use it for letter and number practice. The possibilities are truly endless.
One of my favorite activities is making clay faces. Roll balls for heads, then add features with smaller pieces. It’s amazing how creative kids get when they’re not worried about their creations falling apart.
Why This Recipe Changes Everything

Making your own modeling clay might seem like just another craft project, but it’s so much more than that. It’s about slowing down, creating something with your hands, and giving your children an open-ended activity that actually holds their attention.
There’s something deeply satisfying about making something from scratch that works better than anything you can buy. Every time my daughter asks for “the clay we made together,” I’m reminded that the best toys aren’t always the ones that come in fancy packages.
This recipe has become our go-to rainy day activity, birthday party favor, and last-minute entertainment solution. It’s saved my sanity more times than I can count, and I hope it does the same for you.
The next time you’re staring at dried-out store-bought play dough or facing a bored child with nothing to do, remember that everything you need to create something amazing is probably already sitting in your kitchen pantry.

Ms. Kerri’s Corner provides a exciting virtual space for preschool learning. Through a variety of engaging activities, she exposes young minds to early math, literacy, science and social-emotional skills in a developmentally appropriate way. Centers for blocks, art, books and music allow children to explore hands-on learning at their own pace. Guided lessons subtly introduce number sense, letter sounds and narrative thinking. Careful observation gives insight into each child’s progress across domains. Viewers are also invited to participate, reinforcing that their ideas are valued. By making learning fun yet purposeful, Ms. Kerri lays the groundwork for future academic success while fostering creativity and imagination. Her program offers preschoolers valuable screen-based learning experiences.