Last Fourth of July, while watching my neighbor’s elaborate fireworks display, my eight-year-old daughter asked me why we couldn’t make our own fireworks. After explaining why backyard pyrotechnics weren’t exactly safe, I promised her we’d create something just as exciting indoors. That’s how we discovered the magic of fireworks in a jar – a simple science experiment that combines patriotic colors with fizzy chemistry reactions that look exactly like tiny fireworks exploding in water.
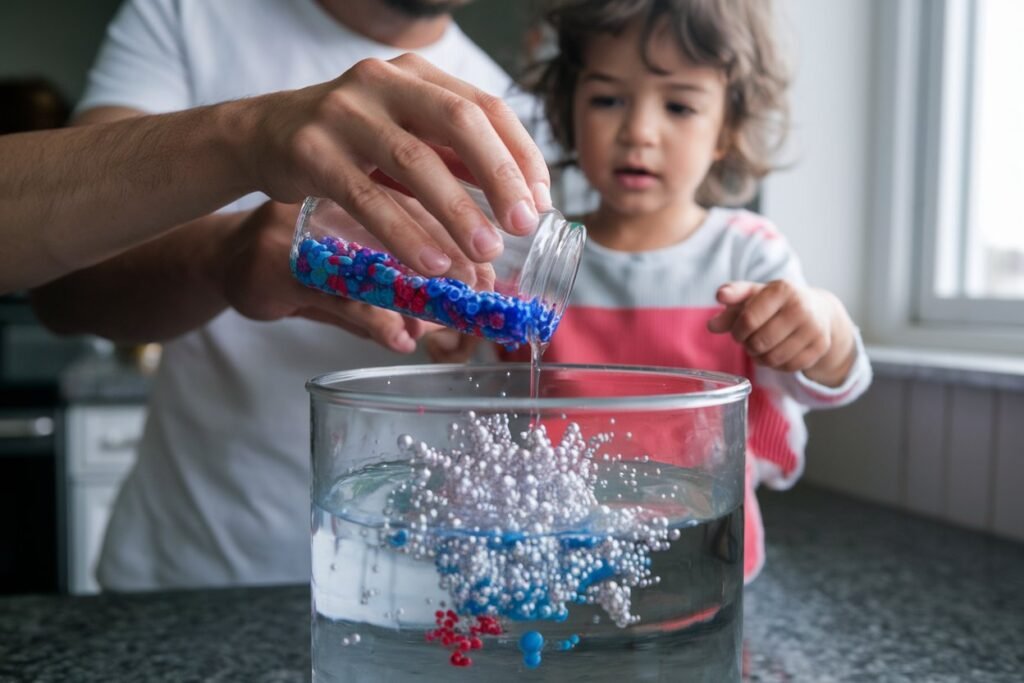
The first time we dropped that Alka-Seltzer tablet into our carefully layered red, white, and blue mason jar, both kids gasped in wonder. Colorful streams shot up through the oil, creating bursts that looked just like the real thing. Even better, we could make it happen over and over again, each time creating a slightly different effect.
What started as a way to satisfy my daughter’s curiosity turned into our favorite summer tradition. Now every year, we spend the afternoon before the Fourth making multiple jars with different color combinations and effects. It’s become the perfect blend of patriotic celebration, hands-on science learning, and pure magical fun that keeps kids engaged for hours.
The Science Behind the Magic
Before we dive into making your own fireworks jar, let’s talk about what makes this DIY 4th of July science craft so captivating. You’re actually creating two different scientific phenomena at once, which is why the effect is so spectacular.
First, you’re demonstrating density differences between oil and water. Oil is less dense than water, so it naturally floats on top, creating distinct layers. When you add food coloring to the water, it can’t mix with the oil, so you get these beautiful, separate colored zones.
The second part involves an acid-base reaction. When the Alka-Seltzer tablet hits the water, it releases carbon dioxide gas. These gas bubbles are less dense than both the oil and water, so they race upward through the layers, carrying tiny droplets of colored water with them. When the bubbles reach the surface and pop, the water droplets fall back down, creating that perfect fireworks effect.
What makes this experiment so perfect for kids ages 6-12 is that they can see both scientific principles in action simultaneously. The visual is so striking that they remember the lesson long after the fizzing stops.
Gathering Your Materials
The beauty of this project lies in its simplicity. You probably have most of what you need already in your kitchen and craft supplies. Here’s what you’ll need for each jar:
A clear mason jar or tall glass container works best. The wider the mouth, the easier it is to add ingredients and drop in tablets. I prefer quart-sized mason jars because they give you plenty of room for dramatic effects.
For the liquid layers, you’ll need vegetable oil and water. Any cooking oil works, but vegetable oil is clear and doesn’t have a strong smell. You’ll need about twice as much oil as water for the best layering effect.
Food coloring is where you can get creative with your patriotic theme. Traditional red, white, and blue work perfectly, but don’t feel limited. We’ve made beautiful jars using pink and purple for a sunset effect, or silver and gold for New Year’s celebrations.
The star of the show is Alka-Seltzer tablets. Buy the generic version – they work just as well and cost much less. Each tablet creates about 30-45 seconds of fizzing action, so stock up if you want to repeat the experiment multiple times.
For decoration, gather star stickers, patriotic ribbon, and any red, white, and blue craft supplies you have on hand. This is where kids can really personalize their creations.
Creating Your Patriotic Layers
Start by decorating your mason jar exterior. This is the perfect job for younger kids who might need help with the more precise steps later. Let them wrap ribbon around the jar, stick on star stickers, or even paint patriotic designs with washable paint. Just make sure the decorations don’t cover the area where you’ll be watching the fireworks action.
Now for the layering, which requires a bit more precision. Fill your jar about one-third full with water. This doesn’t have to be exact – you’re aiming for enough water to create a good reaction zone without making the jar too heavy.
Add your food coloring to the water. This is where this DIY 4th of July science craft gets really fun. For traditional patriotic colors, add red food coloring until you get a nice vibrant shade. If you want to create multiple layers, you can add blue to make purple, or leave some sections clear for “white” stripes.
Here’s a pro tip I learned after making dozens of these jars: add the food coloring gradually. You can always make it darker, but you can’t make it lighter once you’ve added too much. Gel food coloring works better than liquid because it’s more concentrated and doesn’t thin out your water as much.
Slowly pour the oil over the back of a spoon to create the clearest separation between layers. Pour it gently down the side of the jar if you don’t have a spoon handy. The oil should float clearly on top of your colored water, creating distinct layers that look almost magical even before you add the fizzy action.
The Moment of Magic
This is where things get really exciting. Have your kids gather around as you drop half an Alka-Seltzer tablet into the jar. I always break the tablets in half because a whole tablet can create such vigorous fizzing that it might overflow.
The reaction starts almost immediately. You’ll see the tablet dissolving in the water layer, creating streams of bubbles that carry the colored water up through the oil. The effect looks exactly like fireworks – colorful streams shooting upward, spreading out at the top, then falling back down in cascading patterns.
Each bubble burst creates a slightly different pattern, so no two fireworks displays are exactly alike. Kids love trying to predict where the next “explosion” will happen or counting how many different colors they can see in each burst.
The initial reaction lasts about 30-45 seconds, but you can keep the show going by adding more tablet pieces. We usually break one tablet into quarters and space out the additions to keep the excitement going for several minutes.
Safety First, Fun Always
While this DIY 4th of July science craft is much safer than real fireworks, there are still some important safety considerations to keep in mind. Adult supervision is essential throughout the entire process, especially when handling the Alka-Seltzer tablets and during the fizzing reaction.
The main safety concern is the vigorous bubbling action. Sometimes the reaction can be more energetic than expected, causing liquid to splash out of the jar. Have towels ready and make sure kids stand back slightly when you first add the tablet.
Never let kids put their faces directly over the jar opening during the reaction. The carbon dioxide gas isn’t harmful in these small amounts, but it’s good practice to avoid breathing directly over any chemical reaction.
Make sure the jar is on a stable surface where it won’t tip over. We always do this experiment on a tray or in the sink to contain any potential spills.
Extending the Learning
Once you’ve mastered the basic fireworks jar, there are endless ways to expand this DIY 4th of July science craft into a bigger learning experience. Try making multiple jars with different color combinations to see how various food colorings behave differently.
Experiment with different oil types – coconut oil, olive oil, or baby oil all create slightly different effects. Some oils are thicker, which changes how the bubbles move through them.
Create themed jars for different occasions. Orange and black for Halloween, green and red for Christmas, or pastels for Easter. The science principles remain the same, but the visual effects are completely different.
Challenge older kids to predict what will happen if you use different amounts of oil versus water, or what might change if you use hot versus cold water. These variations turn a simple craft into a proper scientific investigation.
Making Memories and Taking Photos
Part of what makes this experiment so special is how photogenic it is. The colorful bubbling action creates Instagram-worthy moments that capture both the science and the joy on kids’ faces.
For the best photos, make sure you have good lighting. Natural light works best, but if you’re doing this indoors, position your jars near a window or use a bright lamp. The colors show up much more vibrantly with proper lighting.
Take videos as well as still photos. The movement of the bubbles is mesmerizing, and you’ll want to capture that dynamic action. Slow-motion video can reveal details of the bubble formation that you miss in real time.
Don’t forget to photograph the kids’ faces during that magical moment when the first tablet hits the water. Their expressions of wonder and excitement are often more precious than the experiment itself.
Cleanup and Storage Tips
One of the best things about this DIY 4th of July science craft is how easy it is to clean up afterward. The oil and water can be disposed of down the drain with plenty of hot water and dish soap. The food coloring washes away easily with soap and water.
Save your decorated mason jars for future experiments. Once cleaned, they’re perfect for storing other craft supplies or for repeating the experiment later. We keep a dedicated “science jar” collection that gets used for various experiments throughout the year.
If you want to preserve the layered effect without the fizzing action, you can create display jars by simply layering the oil and colored water without adding tablets. These make beautiful decorative pieces that remind kids of their scientific discoveries.
Why This Craft Works So Well
What makes this DIY 4th of July science craft so successful is how it combines multiple elements that kids love. There’s the anticipation of waiting to see what will happen, the dramatic visual payoff, the satisfying fizzing sounds, and the scientific discovery all rolled into one activity.
It’s also perfectly scalable. You can do this as a simple five-minute demonstration or extend it into an hour-long exploration of different variables and effects. It works equally well for one child or a whole group of kids at a party.
The patriotic theme makes it feel special and connected to the holiday, while the science component gives it educational value that parents appreciate. It’s the perfect balance of fun and learning that makes both kids and adults feel good about the time spent.
Creating fireworks in a jar has become more than just a craft activity in our house – it’s become a cherished tradition that marks the beginning of our Fourth of July celebration. Every year, the kids look forward to making their jars almost as much as they look forward to seeing the real fireworks later that evening.

Ms. Kerri’s Corner provides a exciting virtual space for preschool learning. Through a variety of engaging activities, she exposes young minds to early math, literacy, science and social-emotional skills in a developmentally appropriate way. Centers for blocks, art, books and music allow children to explore hands-on learning at their own pace. Guided lessons subtly introduce number sense, letter sounds and narrative thinking. Careful observation gives insight into each child’s progress across domains. Viewers are also invited to participate, reinforcing that their ideas are valued. By making learning fun yet purposeful, Ms. Kerri lays the groundwork for future academic success while fostering creativity and imagination. Her program offers preschoolers valuable screen-based learning experiences.